The Luckfox Pico Mini is a thesaurus of a name for a teeny Rockchip RV1103 development board that can run Linux (mainly Ubuntu and buildroot).
It has a bunch of the usual pins and peripherals, but unfortunately there is no traditional networking (WIFI/LAN). You can use RNDIS to run TCP over USB which does work – it just removes the point of an SoC if you need a ‘host’ PC to talk to it.
Fortunately the Mini has a PHY and MAC, broken out to the bottom edge which you can link to an ethernet port. Even better, the Milk Duo V shares a similar interface, so you can use this ethernet adapter.
Two RJ45 breakout boards with heatshrink and nail polish added for resistors.
Its straight-forward – add two 100R resistors to the LED pins, some heatshrink and some nail-polish to mitigate shorts.
We’ll need to also add some extra headers to the Mini’s GPIO. I picked two closest to the ETH pins; 11 and 12. We’ll use 11 (GPIO1_C5_d) for link and 12 (GPIO1_D0_d) for activity. Pretty sure any pin could be used, just avoid the 1.8V ones.
Build your firmware as usual and copy to an SD card.
Boot and you’ll see that still, nothing lights up :/
Thats because we need to run a few lines to configure which network port we’re monitoring activity and link for – the device tree doesn’t allow us to do that.
Run:
# Might need 'sudo passwd root' to configure your root account first
su root

# Assumes 'eth0' is the port to monitor
echo eth0 > /sys/class/leds/eth_link/device_name
echo eth0 > /sys/class/leds/eth_act/device_name

# Now we'll assign what triggers should be active
echo 1 > /sys/class/leds/eth_link/link
echo 1 > /sys/class/leds/eth_act/rx
echo 1 > /sys/class/leds/eth_act/tx
Tada!
There are many ways to automate this script, but I’ll leave that up to the reader.
This is a quick post to give some more information about my pond stream and hopefully answer some of the more common questions.
Pond from above
Backstory
When I moved into my current house, the garden had a pond stocked with a few fish which I suddenly had thrust into my care. After figuring out how filtering, feeding etc. worked, I set to automating the process and monitoring which you can check out here.
All was well for 2 years, then suddenly – once the newly hatched fish had reached their full size – they all started dying off. Once I saw the fish were acting sluggish and refusing food, I purchased everything I could from Amazon – water testing kit, chlorine filter, air stones, new filter media, a pond bomb and new UV bulb. I immediately got the water tested at a local pet store, but they didn’t have a test for ammonia available.
Thinking the water was bad, I scooped out the still wiggling fish into a dechlorinated inflatable pool and hoped that I could triage the survivors. The air stones arrived, and the pond soon looked like a jacuzzi as I tried to raise the oxygen level. The water was crystal clear with the fresh filter/UV bulb and the temperature was good. Clear water doesn’t mean that there isn’t a problem however, and I had no way of knowing without a testing kit.
Unfortunately, most of the fish died, including all the large koi, most of the fish babies from the previous year, and some older goldfish. With all the effort, I was left with Violent Ken the goldfish, a Comet and two dark goldfish hatchlings. It was depressing having to net out and bag up the koi. Do not recommend.
Don’t mess with Violent Ken. He’s seen some things
The water tests were all within spec, but this was only really checked after the other actions were taken as it took a while to arrive.
It was a kick in the ass that I need to care more about what is going on in my pond – I failed as their caretaker. Not having a water testing kit was my biggest mistake, but not identifying when they’re acting off was my next.
I waited a few weeks for the pond to settle, tested the water, and purchased some new fish to keep the remaining 4 company.
This then led to me getting an underwater camera…
Keeping a fish-eye on everything
I have a Synology NAS with their Surveillance system which allows you to connect IP cameras and it’ll save the footage and make it available via their webclient. It’s really simple to set up, although you have to buy additional licences for more than 2 cameras. I already had a few house cameras set up, so adding another camera would be easy enough.
Really need to clean the lens, some of those cameras are looking a bit blurry
I found this camera on Amazon which fit the bill. After getting a CAT6 cable set up and battling the half-translated software, I had everything working.
Camera just having a great time here
Me and my girlfriend started to have the Synology webclient running in the background while working as its quite relaxing to watch. I then shared a link with some friends, but it wasn’t intuitive to log into and a bit of faff to set up.
I then found the built-in Synology solution to publish to Youtube – Live Broadcast. You enter the RTMP path from Youtube and your stream key, then choose the camera and quality to send. Done and dusted….?
Don’t take my stream key plz
Well, it seems like my older NAS didn’t have the muscle to re-encode the stream at HD quality and I could just about push the low quality stream at around 480p. The Live Broadcast client also doesn’t handle network drop-outs very well either meaning the stream kept going down.
Embarrassed that I couldn’t show off my pond, I set to work on another solution.
Docker and the over-engineering of
I have a few websites (including this one) that I run from a NUC that I don’t want to pay an external host for. It has an Intel i5-7260U which is a fair bit better than the STM Monaco STiH412 in my NAS. To compartmentalise all the projects I have on there, I use docker.
My goals were to get the stream to Youtube with auto-restart, but that quickly changed to wanting to add overlays and other silliness. Here is the overview:
‘fish’ might be the most popular comment in the live chat
The magic contains the following:
blynk_connector is a python alpine image with a script that repeatedly runs multiple REST API calls against the Blynk server (which my sensor projects publish to) and writes them to the database.
webserver is a php apache image that runs some basic MySQL queries for current and historic data then serves a small HTML page with the stats, something like this:
I have to admit that I used <table> for this
renderer is a browserless/chrome container that is normally used for headless automation like integration testing and QA. Here I’m using it to take a screenshot of the HTML page and return a PNG.
overlay is another python image that orchestrates renderer by asking it for the PNG and moving it into the encoder image. It does this every 15 seconds.
encoder is an image with ffmpeg available. It pulls an internal Synology-provided RTSP feed from the camera, adds the PNG overlay and then puts a subtitle announcement displayed at the top of the stream.
The command it runs is nice and complicated. I’m no expert with ffmpeg, but its working:
Now I (and you!) can watch the health of my fish from the warmth of the house. By having the camera and some viewers I’ve got an even better incentive to keep the water clear.
I think in the summer I’ll drain the pond and make it a bit more aesthetic.
At the time of writing, we’re celebrating Fishmas, and I hope you can join us in the stream too!
UPDATE:
I’ve updated ffmpeg to output to both Twitch and Youtube and in doing so I noticed the stream failing a few times, especially with YT. Especially irritating is that the YT link changes when the stream returns and I’m assuming anyone subscribed would get an alert that the stream is alive again.
So I created a new container that reads the log output from ffmpeg, compares the encoded frame number and restarts the container if needed. Here is the script panopticon runs:
#!/bin/sh

function log() {
    echo "[$(date +%F_%T)] $1"
    printf "[%s] %s\n" "$(date +%F_%T)" "$1" >> /app/stream.log
}

log "Started! Waiting (15s)"

sleep 15
while true
do
    MOST_RECENT_FFMPEG=`ls -t /app/logs/ffmpeg* | head -n1`

    frameA=$(tail ${MOST_RECENT_FFMPEG} -n 1 | sed -nr 's/.*frame=(.*)fps.*/\1/p')
    sleep 1
    frameB=$(tail ${MOST_RECENT_FFMPEG} -n 1 | sed -nr 's/.*frame=(.*)fps.*/\1/p')

    log "Frame numbers: $frameA-> $frameB"

    if [ "$frameA" = "$frameB" ]
    then
        log "Stream has hung :("
        docker restart pond-stream_stream_1
        log "Restarted container"
        log "Waiting for container start (30s)"
        sleep 30
    else
        log "OK"
    fi

    sleep 2
done
This is based of a script I found by chrisstubbs93 here.
I also changed the YT stream to be scheduled instead of using the ‘Go Live’ button. A scheduled stream can be set to not auto-stop and it seems to give a bit more breathing room between loss of data.
Hopefully I’ll be able to get a new uptime highscore with this. I’ll embed it to show my confidence…
EDIT: Spoke too soon, the camera itself crashed 🙁 Did manage 366 hours though.
New ffmpeg script. I specifically want the command to fail if either stream dies as the container will just auto-restart and try again.
EDIT EDIT: In the end the YT stream lasted for months, but my poor home internet connection couldn’t handle streaming to both YT and Twitch.
I found Twitch to provide a better experience – less lag so faster feature usage – so have completely switched to just streaming via Twitch – https://www.twitch.tv/underwaterpondcam
I also stopped using ffmpeg, and instead used an old laptop with OBS running which allows for more customisation, hardware encoding and additional cameras. It also lets my poor NUC cool off.
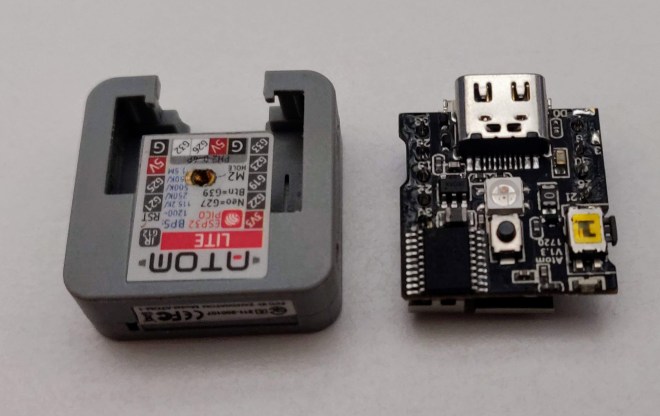
After working on my pond control project, I wanted to be able to increase the range of some M5Stack ATOM Lite modules. These modules are ESP32 based and come in a tiny form-factor.
They open easy enough after removing the sticker on the back and then squeezing the clam-shell case. Only 3 parts make up the module – case halves and the PCB inside.
Case and the PCB side-by-side
Flipping over the PCB shows the 3D antenna connected to a capacitor-inductor network and the LNA pin on the ESP32-Pico chip.
3D antenna
The sheet-metal antenna is attached at 4 points – one top left, one top right (obscured) and the two bottom right in the foreground. With a little soldering and flux cleanup, the antenna is removed. I used a quick-clamp as a poor-mans PCB holder.
The left-hand pad is the LNA pin, and the right is a ground pad. The two upper pads are not connected to any trace I could find.
The idea is to get the antenna out the side of the case without interfering with the reset button, and also not coming out the bottom or rear (it would prevent the module from being used in the many modules – e.g. the PoE kit). I drilled a small hole in the case.
I cut back the end of a SMA pigtail connector, and tinned the ends.
I threaded the pigtail through the hole, and soldered the centre pin to the left pad, and the outer shield to the right ground pad.
Closing up the unit, I was ready to test
Before starting the internal antenna removal, I ran a simple sketch to list found AP’s. With the internal antenna, a maximum of 8 networks were discovered. With the external antenna, a maximum of 12 networks were found.
This isn’t the most scientific, but gives an idea of the improvement. I also listed the RSSI along with the AP name, and compared the two. The AP I picked was one that I had configured in the garden with 2 walls between.
The red – external – line clearly shows an improvement over the internal antenna.
The final step will be to add a small amount of epoxy to the antenna penetration in the side of the case for mechanical strength. Quick project done.